Levelling Ramps – keeping your caravan level (and your sanity intact)
You pull onto a pitch, hop out feeling smug about your reversing, open the caravan door… and it swings like it’s trying to escape. The fridge starts complaining, your shower tray looks like a paddling pool, and suddenly you’re doing that awkward shuffle where you keep stepping back to “eyeball” level as if you’ve got a spirit level built into your forehead.
This is exactly why caravan levelling ramps exist. Not because you’re doing caravanning wrong, but because UK pitches aren’t always billiard-table flat, and caravans are much less forgiving of slopes than your brain wants them to be.
This guide is for normal humans, not people who claim they can level a twin-axle by intuition alone. We’ll cover what ramps actually do, how to choose the right set in the UK, how to use them without the usual faff, and when you should stop chasing “perfect” and just get the kettle on.
What levelling ramps actually do (and what they don’t)
Levelling ramps raise one side of the caravan by a controlled amount so the caravan sits closer to level across its width. They’re primarily for side-to-side levelling - left to right - because your wheels can only move up and down relative to the ground, not magically shorten the chassis.
Front-to-back levelling (nose up or nose down) is normally handled with the jockey wheel once you’ve uncoupled. Some people try to drive up ramps to fix front-to-back as well, but in practice it’s a lot easier (and safer for your blood pressure) to treat ramps as side-to-side, then use the jockey wheel for the rest.
What ramps do not do is make an unreasonably sloped pitch “fine”. If you’d need a small staircase to reach the door, that’s not a levelling ramp problem - it’s a pitch choice problem.
Why levelling matters more than people admit
No, you won’t instantly damage your caravan because you’re half a bubble off. But levelling isn’t just about comfort, and it’s not just about the door staying where you leave it.
A few practical reasons it matters:
First, fridges. Many caravan fridges (especially absorption types) are fussier about being level. They’ll often still work when slightly off, but efficiency can drop and you can get poorer cooling - which is brilliant news when you’ve just stocked up for the weekend.
Second, drainage. Sinks and shower trays are designed with a gentle fall in mind. If you’re pitched at a jaunty angle, you might find water pooling, draining slowly, or heading in a direction it wasn’t invited to.
Third, stability and feel. A caravan that’s noticeably off-level can feel more “lively” when people move about. Levelling doesn’t replace proper steadies and chocking, but it helps the whole set-up feel settled.
The key is sensible levelling - good enough to function and feel comfortable - not turning your arrival into a competitive sport.
Caravan levelling ramps UK: the main types you’ll actually see
In the UK, most ramps fall into a few real-world categories. Marketing names vary, but the practical differences are fairly consistent.
Stepped ramps (the common, simple option)
These look like a chunky wedge with steps, usually offering three heights. You drive the wheel up to the step you need.
They’re popular because they’re affordable, quick, and don’t require much finesse. The compromise is that the height options are fixed. If you need “two and a bit steps”, you choose between slightly under and slightly over.
Curved or “roll-up” ramps
These have a curved shape so the wheel rolls smoothly to different heights, often with a chock that slots in to stop the wheel rolling back.
They can be easier to drive onto without lurching from step to step, and the height adjustment can feel more precise. They’re often pricier and a touch bulkier.
Stackable blocks
Technically not ramps, but many caravanners use them for levelling because you can build the height you need. You drive onto a platform made from interlocking blocks.
The upside is adjustability. The downside is time, plus the fact that if the stack isn’t built sensibly on firm ground, you can create a wobble you then try to “fix” with steadies (which is the wrong tool for the job).
Inflatable levelers
Yes, they exist. You roll onto a tough inflatable bag and pump it up.
They can be brilliant on certain surfaces because they spread the load, but they’re not everyone’s cup of tea. They also add another “thing” to look after, another valve to lose, and another opportunity for you to discover that your pump is in the garage at home.
Choosing the right ramps: what matters (and what’s just noise)
If you search for levelling ramps, you’ll quickly find yourself drowning in claims about “heavy duty”, “maximum grip”, “ultra strong polymer”, and so on. Some of it matters, some of it is just a product description having a moment.
Here’s what genuinely affects whether a set of ramps works for you.
Your caravan’s weight and wheel load
Ramps have maximum load ratings. The detail that matters is whether that rating is per ramp (per wheel) or per axle. Manufacturers vary, and the internet does what it always does: argues.
In practical terms, you want a ramp that comfortably exceeds the load it will see from one caravan wheel. If you’re unsure, don’t guess wildly. Start with your caravan’s MTPLM and think about worst-case loading. If you want a calm explanation of weights without the usual drama, this is worth a read: Caravan weights in the UK, explained calmly.
Also remember that noseweight shifts load forward. A heavily loaded front locker and a high noseweight can mean the front axle carries more than you intuitively expect. You don’t need to do advanced maths on site, but it’s one more reason to buy ramps with headroom, not ones that are “probably fine”.
Tyre width and ramp width
Caravan tyres aren’t all the same width, and ramps vary too. A wheel that sits awkwardly on a narrow ramp can feel unstable, especially when you’re part-way up.
Wider ramps generally feel more confident, particularly for single axle caravans where the whole job is done by one wheel on one ramp. If your ramp has a separate chock, make sure it actually fits your tyre size and tread pattern.
Maximum lift height
Most UK pitches only need a modest lift. But if you tour a lot - especially older CLs or farm sites - you may find you need more height than a basic three-step ramp provides.
There’s a catch: more lift means more angle, and more angle can mean more wheelspin or a more dramatic “clunk” as you climb. So don’t buy the tallest ramp just because it exists. Buy the height you’re likely to use.
Grip on wet grass and loose gravel
British weather has a habit of being involved. On wet grass, even the best ramp can slip if the ground underneath gives way.
Look for ramps with aggressive tread and a decent footprint. But also accept reality: if the pitch is soft, you may need to put a grippy mat or levelling pad under the ramp to stop it sinking or sliding. That’s not you failing at caravanning. That’s Britain being Britain.
Storage and faff factor
Ramps live in your front locker, under a seat, or in a storage box. Big ramps are great until you realise you hate packing them.
If you’re the sort of person who values a quick, low-stress set-up, pick something that you’ll actually use every time. The best ramp is the one you don’t resent.
How to level on ramps without turning it into a performance
Levelling is easiest when you do it in the right order. The goal is fewer adjustments, not heroic patience.
1) Pick the best spot on the pitch first
Before you even think about ramps, look at the pitch. If you can position the caravan to reduce the slope - for example, a foot left or right - do that. A tiny reposition can save you a whole step of lift.
If the pitch has obvious hollows, avoid putting a wheel into one. Levelling ramps can raise you up, but they don’t magically firm up soft ground.
2) Check the side-to-side level
Use a small spirit level, or a levelling app if you trust your phone not to interpret “tilt” as “panic”. Many people place a small level on the floor just inside the door, or on a worktop.
You’re looking for which side is low. That tells you which wheel(s) need to go up. On a single axle caravan, it’s usually one wheel. On a twin axle, it can be both wheels on one side depending on the slope.
3) Place the ramp and line up properly
Put the ramp in front of the wheel you need to raise, with the ramp straight and stable. If you’re using two ramps (twin axle or you’re raising both wheels on one side), align them so the wheels climb evenly.
If you’re on grass or soft ground, consider putting a solid pad under the ramp first. This spreads the load and reduces sinking.
4) Drive up slowly - with someone guiding if possible
Slow is smooth, smooth is controlled. A helper outside makes this much easier. Agree clear hand signals and keep it simple.
When the wheel reaches the height you want, stop. Apply the handbrake firmly. Put the car in gear (or Park for an automatic) before you both celebrate.
If you’re solo, you can do it, but it’s more stop-start. Some caravanners place a marker next to the ramp step they’re aiming for so they can see it in the mirror.
5) Chock the wheel and re-check level
Chock the wheel on the ramp so it can’t roll back. Re-check level inside the caravan. If you’re close enough, you’re done. If you’re wildly off, come down and try again - don’t keep creeping forward hoping it will magically become correct.
6) Unhitch and do front-to-back levelling with the jockey wheel
Once you’re happy side-to-side, unhitch. Then wind the jockey wheel to level front-to-back.
A gentle reminder that steadies are not for lifting or levelling. They’re for stabilising. If you try to “level” with steadies, you’re basically asking four corner legs to do a job they weren’t hired for.
Twin axle caravans: what changes (and what doesn’t)
Twin axles can feel trickier because there’s more tyre on the ground and more mass to persuade up a ramp. But the principles are the same.
If the caravan is leaning to one side, you usually raise both wheels on the low side so the axle line stays roughly parallel. Some people raise just one wheel if the slope is mild and they’re only chasing a small correction, but you can create odd loading if you’re not careful.
You’ll want ramps designed for twin-axle use, or two ramps with suitable load ratings. Getting both wheels onto two ramps evenly is the main challenge. A helper is particularly useful here because it’s easy for the front wheel to climb while the rear wheel hesitates, or vice versa.
Common mistakes (so you don’t have to make them yourself)
Most ramp “fails” aren’t because the ramp is rubbish. They’re because we’re in a rush, it’s raining sideways, and we’re trying to impress a man in a gilet two pitches down.
Trying to level with the steadies
It’s the classic. You wind down the steadies until the caravan looks level, then wonder why it feels like a trampoline inside. Levelling should be done with wheels and jockey wheel. Steadies are the final stabilise step.
Over-chasing perfect level
If the fridge is happy, the door behaves, and you’re not rolling out of bed, you’ve levelled enough. A millimetre here or there won’t ruin your holiday.
Not using a chock
A ramp without a chock is like a hill without gravity - it only works in theory. Chock it properly every time.
Spinning the wheel on wet grass
If the wheel spins, stop. Spinning digs holes and polishes the grass into a slipway. Reposition, add grip under the ramp, or reduce the height you’re trying to climb in one go.
Ramps not square to the wheel
If the wheel climbs at an angle, it can slip or push the ramp sideways. Take ten seconds to align it. Ten seconds now beats ten minutes of “why won’t this work” later.
What to use with ramps (and what’s optional)
You don’t need a laboratory of accessories, but a few items make levelling calmer.
A small spirit level is still the simplest tool. A pair of wheel chocks that actually fit your tyre is non-negotiable. Levelling pads or solid boards can be genuinely helpful on soft ground, especially if you’re often on CLs.
If your ramps have a separate chock that locks in, great. If not, a wedge chock behind the wheel adds security.
Safety and site etiquette - the quiet bits that matter
Levelling involves moving a towing outfit on a pitch, sometimes with people walking past and children on scooters doing laps like it’s the Tour de Campsite.
Go slowly, keep your helper visible, and don’t be shy about pausing until the path is clear. If you’re on a tight pitch, take your time and don’t let an audience hurry you.
Also, avoid digging up the pitch if you can. If you do make a rut in soft ground, fill it in as best you can. It’s boringly considerate, which is the highest form of British virtue.
How much levelling is “enough” in real UK touring?
Here’s a practical benchmark: if your fridge works as expected, the door doesn’t swing wildly, the shower drains sensibly, and the caravan feels stable, you’re done.
If you’re slightly off but comfortable, I’d take that over repeated attempts that stress you out. Levelling is meant to support your trip, not become the main event.
There are exceptions. If you have a very sensitive fridge, or you’re staying for a long time, it can be worth being a bit more precise. Likewise, if you’re noticeably off-level, it’s worth correcting properly because the irritation builds day after day.
Buying advice without the hype
If you’re shopping in the UK, you’ll see a lot of confident claims. Keep your decision grounded:
Choose ramps that are load-rated with clear specs, wide enough for your tyres, and tall enough for the pitches you actually use. If you mostly stay on well-kept club sites, you probably don’t need the tallest, heaviest ramps on the market. If you tour a lot of rural sites, you might.
If you’re a beginner and you’re already juggling towing confidence, pitching, and all the new-kit mental load, prioritise simplicity. A straightforward stepped ramp plus a reliable chock is often the least stressful start.
And if you’re building your overall confidence with towing and set-up, the calm approach matters more than the gadget choice. There’s a reason we talk so much about reducing faff and pressure - it keeps you safer and more relaxed. If that’s your current phase, Towing a Caravan for Beginners: Calm, Confident Starts pairs nicely with the levelling basics.
A quick reality check on “levelling systems” and upgrades
Some caravanners add more advanced systems over time: built-in levelling aids, automatic levellers, or heavier-duty kit for full-timers.
They can be brilliant, especially if mobility is an issue or you tour constantly. But you don’t need any of that to tour confidently in the UK. For most people, a decent set of ramps, sensible positioning, and a calm process is 95% of the win.
If you find yourself thinking, “Maybe I need to buy something expensive because everyone online says so,” pause and ask: is this solving a real problem I’ve experienced, or am I trying to buy certainty?
Caravanning is full of that trap. Levelling ramps are a practical tool, not a moral identity.
When levelling ramps aren’t the answer
Sometimes the correct move is simply to ask for a different pitch, or to reposition.
If you need extreme lift, if the ramp feels unstable, if the ground is so soft you’re sinking immediately, or if you’re on a slope that makes you uncomfortable, it’s fine to change the plan. Site staff would usually rather move you than watch you wrestle with physics for half an hour.
And if you’re arriving late and tired, “good enough for tonight” is often the right call. You can re-level in the morning with daylight and a clear head.
If you want more calm, experience-led set-up guidance like this, you’ll find plenty at CaravanVlogger - the aim is always fewer myths, less stress, and more trips that feel straightforward.
Levelling ramps are just one of those little bits of kit that make caravanning nicer when you stop treating them like a test. Get the wheel up, chock it, steady the van, and then go and enjoy the part you actually came for.
Which Levelling Ramps Are Worth Considering?
There isn’t a single “best” ramp for everyone, but based on published specifications and consistent UK buyer feedback, a few models stand out as sensible options.
Most Balanced Option for Typical UK Caravans
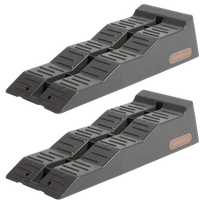
WilTec Caravan Levelling Ramps (3T, 3-Step)

The WilTec 3-tonne stepped ramps sit comfortably in the “sensible middle” for most UK touring caravans. The three height levels are usually enough for typical club and CL pitches, and the 3T rating provides reassuring headroom without feeling like overkill. For the majority of single-axle caravans, they offer a practical balance of strength, adjustability, and price.
In everyday use, the stepped design makes positioning predictable. Once you’ve used them a few times, you’ll roughly know which step suits your outfit. On firm ground they feel stable and secure, provided the tyre is aligned squarely and you approach slowly. Like most plastic ramps, they can slide on wet grass if you rush or spin the wheel — that’s more about technique than the ramp itself.
They’re not a premium, engineered levelling system — and they don’t need to be. For regular touring where you want something dependable, straightforward, and not overly bulky to store, they’re a calm, competent choice that simply gets on with the job.
Good Value Option
VonHaus Levelling Ramps
The VonHaus stepped levelling ramp set is a straightforward, affordable option for typical UK touring caravans. The three fixed height steps make positioning predictable, and for most single-axle vans within sensible weight ranges, the 2.5-tonne rating provides adequate headroom. It’s designed for practical, repeatable side-to-side levelling without overcomplicating the process.
In normal use, the stepped format removes guesswork — you’re choosing between clear height stages rather than trying to “creep” to a perfect point. On firm ground they feel stable, provided the tyre is placed squarely and you approach slowly. Like all plastic ramps, they can shift on wet grass if you rush or spin the wheel, so calm positioning matters more than branding.
They won’t turn a steep pitch into a flat one, and they’re not a premium engineered system — but for regular club sites, commercial parks, and everyday touring, they’re a sensible, low-fuss choice that does exactly what levelling ramps are meant to do.
Higher-Spec System Option
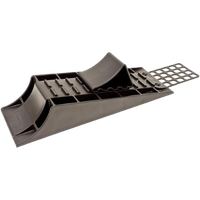
Maypole Froli 3-Part Levelling Ramp Set
The Froli 3-part levelling set is designed as a small, integrated system rather than just a pair of ramps. You get a stepped main ramp, a lead-in plate to smooth the initial climb, and a matching wheel chock to secure the tyre once you’re in position. That combination makes the process feel more controlled and deliberate, especially if you value repeatability over improvisation.
In everyday UK touring, this type of setup suits caravanners who want a calmer, more progressive approach to levelling. The lead-in plate reduces the “clunk” as you start to climb, and the stepped ramp gives you clear stopping points rather than relying on guesswork. Used properly — slow approach, square alignment, proper chocking — it removes much of the drama from side-to-side levelling on typical club and commercial pitches.
It isn’t a solution for extreme slopes, and it doesn’t replace sensible pitch positioning. But for regular touring where you want something a little more refined than basic ramps, without moving into complex levelling systems, it’s a well-thought-through option that prioritises control and consistency.
That keeps the authority, removes the lecture, and matches the tone of your other two sections.
If you’d like, next we can quickly check all three product blocks read consistently in voice and length — just a final polish pass.
🔧 TalkWrench Tip
Before driving onto levelling ramps, wind the jockey wheel up slightly so it isn’t carrying weight.
If the wheel is still taking load while you climb the ramp, it can resist movement and make the caravan harder to position accurately.
Get the wheels doing the work first, then fine-tune front-to-back once side-to-side levelling is done.